Monday, April 23, 2012

Caramelized Onion Tart with Lemon Zest and Thyme

I had my aunt Vijai, uncle Chico and cousin Randy over as they were eager to visit with Alexis. I always enjoy their visits, but this was even more special because it was all about my little angel. Mom cooked up a storm and wouldn't hear another word about it from me, but I wanted to contribute something, so I made an onion tart. I've done this before but more in a bite size portion, not in an 8" dish, but I did it and it turned out wonderfully. At dinner I had to preface that it was not a sweet tart, but Randy still expected it to taste like desert! It's an appetizer tart, it just didn't get to the table before the food, lol. I still love you Randy.

I forgot to take a picture before everyone had a slice, but this pic shows a great cross section!


Caramelized Onion Tart
_________________________________

Pastry:


Flour
2 cups
Butter (I use margarine)
10 tbsp
Ice Water
1/4 cup
Rosemary
1 tsp (coarsely ground)
Sea Salt
1 1/2 tsp (ground)
Black Pepper
1 tsp (ground)


Filling:

Onions (large)
10
Margarine
1/4 cup
Lemon Zest
from one lemon
Thyme
3 tbsp, dried
Sea Salt
1 tsp
Black Pepper
1 tsp
Sour Cream
1/4 cup


Oven and Pans:
  1. Preheat oven to 350F.
  2. In an 8" pie dish, place a circle of parchment paper with the edges extended beyond the dish. This will allow for easy removal once the tart has cooled.
Preparation - Pastry Dough:
  1. In a working bowl of a food processor, add flour, salt, pepper and rosemary.
  2. Process to combine all dry ingredients.
  3. Remove margarine from freezer and cut cubes into the flour mixture.
  4. Process until mixture becomes course (think sandy). Shouldn't take more than a few pulses.
  5. Add a few tablespoons of the ice water. It will be difficult to process after this and you don't want to overwork the dough, so try to judge how much you need to barely bring the dough together. You likely will not use all the water.
  6. Empty dough and wrap into a ball with clingfilm. I empty the dough right onto the cling film and ball up from there, for minimal handling.
Preparation - Filling:
  1. Slice onions lengthwise in quarter inch thickness.
  2. In a pan, melt margarine on medium heat.
  3. Add onions, stir often being sure to not let the onions brown.
  4. Once they become translucent, reduce heat to medium low and stir only to avoid frying.
  5. Cook down until onions have wilted dramatically and colour has darkened to half the desired shade.
  6. Add black pepper, lemon zest, thyme and salt. Salt earlier would have brought out the moisture of the onion, and that would have increased the time required to begin caramelization.
  7.  Continue cooking and stirring until onions have turned a golden brown and have developed the required sweetness.
  8. Cool. The filling can be made in advance and stored in an airtight container in the fridge until ready to make the pie. Just bring all ingredients to room temperature prior to baking.
Preparation - Tart:
  1. Preheat oven to 350F.
  2. Use as little bench flour as possible and place dough on the board, pressing down the ball until it is a somewhat flattened circle. I leave the cling wrap on top of the pastry. This makes it easy to press without my hands touching the pastry and easy to roll without the pastry sticking to the rolling pin.
  3. Roll out the pastry to approximately a 9" diameter and at least 1/4" thickness.
  4. Lift the pastry and centre over parchment lined pie dish and roll into place.
  5. Press into corners, pinch the edges, and use a fork to pierce the dough for venting (to prevent any air pockets and deformation).
  6. Blind bake the tart shell for 20 minutes.
  7. Remove tart shell and spread a thin layer of sour cream.
  8. Drop onion mixture and use a fork to drag the strands to cover the tart bottom without disrupting the sour cream layer.
  9. Bake for 30-35 minutes or until crust and onion peaks start to brown.


Friday, April 6, 2012

Taking Brunch in the Solarium on Good Friday


We were chatting, it was a warm morning and it just felt relaxing to brunch in the solarium for the first time since moving into the house.


Monday, April 2, 2012

Tuna Wraps

It's one of those rainy mornings where the cold is bone chilling. You want something comfortable to eat. Usually I'd go to fries and hot dogs, soup and sandwich, grilled cheese, toast and tea... but I digress. Yesterday morning was as I described above and I just woke up feeling that tuna salad was what we needed.

I have a simple basic recipe that really works. Again, the key is the accompaniments to the tuna - you can have it creamy and tasty, yet you can do it so that it's not a whole heap of fat or calories.

People knock the low fat or no fat options at the grocery store, but you shouldn't rely on fat for flavour. That's what freshly ground spices and herbs are for. I use low-fat mayo and non-fat sour cream for texture, and for seasoning, use a fresh garlic clove, freshly ground black pepper, and green onions. For lunch sandwiches, I prefer tuna salad cold, but for these breakfast wraps, we added a slice of 'non-fat Kraft sliced cheese' and toasted it in the oven. Out of everything on the list of ingredients, this is the one that everyone seems to hate, yet it flies off the shelf. Someone's buying all this cheese besides me! Chef's hate it because it's processed garbage, and generally it's seen as the simulated oil based non-dairy product. But the Nutrition Data website tells the truth about it - it's actually a decent product that just has a bad reputation. And honestly, nothing gets all melty-gooey like sliced cheese. That's what makes it 'comfort' - it takes you back to your childhood. Just great yummy, unpretentious food. If it makes my family (any myself) happy, that's all that matters.


Tuna Wraps
_________________________________

Tuna Filling:


Canned/Vacupacked Tuna, drained
4 cans
Low-Fat Mayonnaise
1/2 cup
Non-Fat Sour Cream
2 tbsp, heaped
Celery
1 stalk, finely chopped
Green Onion
3 stalks
Garlic
1 clove, finely minced
Worcestershire
1 tbsp
Tabasco
1/2 tsp
Celery Seed
1/2 tsp (ground)
Sea Salt
1 tsp (ground)
Black Pepper
1 tsp (ground)
Lemon Juice
1 tbsp (optional)


Wraps:


Small Whole Wheat Wraps
8
Sliced Cheese
8


Preparation:
  1. In a medium bowl, add strained tuna, celery, green onion and garlic and mix well.
  2. Stir in sour cream until fully incorporated.
  3. Add mayonnaise and make a divot to pool the seasoning before mixing into the tuna.
  4. Add ground celery seed, ground black pepper, Worcestershire, Tabasco, salt and mix into the mayonnaise.
  5. Stir entire mixture together until fully incorporated.
  6. Set oven to 350F (I use a toaster oven).
  7. I place two dollops in the centre of a wrap and spread out to fill the middle third.
  8. Place cheese slice atop the tuna filling.
  9.  Fold in sides of the wrap and hold fast with a toothpick. Lift the wrap a little to ensure the toothpick pierces through the bottom - it holds better this way.
  10. Bake for 10 minutes. each person is served two wraps. This preparation serves four people.

Friday, March 30, 2012

Riccota and Spinach Stuffed Cannelloni

These days I tailor my dinners around what's on sale at the grocery store. Don't get me wrong my Sunshine, but taking care of you (Alexis) and trying to come up with a meal, the mortgage strapping our budget, and me on maternity leave, being cost effective as well as saving on time and labour makes meal preparation a living hell. So I saw a few things on sale and decided I would try this cannelloni. You're right; it's not a quick dish you whip up, but if you do things in steps, you can bring it all together before you're ready to cook.

Alexis, you are a handful, and I can't plan anything that takes longer than fifteen minutes before I have to tend to you in some way. So in choosing what I make this family for dinner, I need to be aware of your needs. Cleaning chicken? Not really a great option unless I'm using legs or breasts - less cleaning. So with this cannelloni, no meat preparation and all done in steps.

Ricotta Spinach Filling


Stuffed and Arranged in Trays
What was on sale? Spinach. Ricotta was still pricey, but you don't need a lot. And I had most of the other ingredients at home. Your spices and herbs make all the difference as well. How did I manage in steps? I prepared the filling the day before. Brought all the pantry ingredients to the kitchen ready for a mad dash to complete as much as I could. I use 'oven ready' pasta which makes all the difference when you're not able to give them your full attention and risk their splitting as you fill them, and just soaking them in a large bowl of cold water is a great prep before baking. I prepped the baking dish. I used a pastry piping bag to fill the cannelloni. I used a canned (gasp) sauce instead of homemade. Come on, when you have a baby to take care of, shortcuts are acceptable. You're not wonder woman, so don't try to bite off more than you can chew. Mom taught me that. Then again, she can whip up a delicious feast in a few hours and make it look like child's play. If she's willing to use shortcuts, who am I to argue?
2 Cans of Sauce
1 Can of Sauce

The most time intensive preparation is stuffing the cannelloni, and as long as you have enough sauce to cover, the rest is super easy. I thought I could get away with one can, but as you can see, it would have been a disaster. The pasta would have dried to a gummy crisp.
Baked - You could see the sour cream holds where the sauce cracks and allows it to become thick and sweet.

I have to admit, when Kayla saw what we were having for dinner she was super excited. I haven't seen her that excited in quite a while. Everyone went back for seconds. Between the three of us, we finished the first tray. I guess this recipe is a keeper.

You just have to trust me when I say this plate contains three cannelloni.


Ricotta Spinach Filling:
1 Tub Riccotta
4 pkgs Frozen Spinach
1/4 cup Parmesan
1 Egg
1/2 tsp Nutmeg
1 tsp Black Pepper (freshly ground)
1 tsp Sea Salt (freshly ground)

Cannelloni:
2 pkgs Cannelloni
2 cans Tomato Sauce
1 cup Sour Cream
5 Garlic Cloves
2 tbsp Oregano
1 tsp Sea Salt
1 tsp Black Pepper (freshly ground)
4 tbsp Olive Oil


Directions (Ricotta Spinach Filling):
Thaw spinach and strain all water.
In a bowl, mix spinach, nutmeg, black pepper and sea salt.
Add ricotta and grated Parmesan and mix well.
Make a well in the middle of the mixture and add the whole egg.
Beat the egg and then incorporate into the mixture.
Refrigerate until required (I did the mixture two days in advance).
When ready to stuff pasta, spoon mixture into a pastry bag with no nozzle attached.

Directions (Cannelloni):
Preheat oven to 350`F.
Fill a big bowl with cold water and soak the cannelloni noodles.
Grease two trays with olive oil.
Spoon enough tomato sauce to coat the trays.
Using the pastry bag, pipe gently into one end of a horizontal cannelloni, making sure your palm covers the other opening. Do not press bag into pasta - this will break the cannelloni.
Place the pasta into the tray.
Repeat this until all cannelloni have been stuffed and they are close (but not touching) in the tray.
Mix sour cream and minced garlic.
Coat the top and sides of all pasta with the sour cream mixture.
Sprinkle trays with salt, pepper and oregano.
Top all pasta with tomato sauce. I add about a half cup of water to each tray to make sure the sauce will get into each little nook to ensures a moist and saucy pasta.
Bake uncovered for 45 minutes.
Turn off the oven and leave it without opening the door until ready to serve.


Thursday, March 15, 2012

Blueberry Cake Muffins


My mother has three cookbooks that are my go-to source for any recipe, so when I wanted to make blueberry muffins, I naturally turned to the only one of those books I have at my house. What they had was a blueberry 'cake' muffin recipe. So I tried it once, sent one for my sister who then called and asked where I bought them from. They were that damn good. The shell of an exterior housing a soft cake interior with delicious blueberries, it was amazing.

This weekend I tried it again with my stepdaughter, but this time I used fresh blueberries instead of frozen. I have to admit - in the case of muffins, frozen is best. Maybe it's because blueberries are out of season that the fresh ones lacked in flavour. But for your best bet, I love the Presidents Choice frozen blueberries. You just have to be more careful when you're folding them into the batter, but it's well worth the effort.

As always, I never use real butter in my baking, or I'd bake once a year if at all. Becel works just fine for me in baking. It's what my mother taught me, and to tell you the truth, you can eat baked goods guilt free when you're using heart healthy ingredients. In the same light, I find every recipe book lists way too much sugar for my tastes. I don't know why everyone wants a super sweet... anything. We're not all five years old and there are other flavours I can appreciate. If I eat a blueberry muffin I want to taste blueberries dammit! Not some blue flecked ball of sugar. For this reason, I almost always reduce sugar by a third. This recipe reflects the changes that makes the muffin that I prefer.

BLUEBERRY CAKE MUFFINS (from the 'The New Revised and Updated McCall's Cookbook')
_________________________________

Flour
2 cups
Sugar
3/4 cup
Milk
1/2 cup
Butter (I use margarine)
1/2 cup
Eggs
2
Baking Powder
1 1/2 tsp

Vanilla Extract

1 tbsp
Salt
Blueberries (frozen)

1/4 tsp
1 1/2 cups


Oven & Pans:
  1. Preheat oven to 375F.
  2. Grease pans with a flour/oil slurry. I find this works best for any baking tins. I recommend a tin of 12 for very large muffins, and adding a tin of 6 for medium sized muffins. The muffins in the picture are a full complement of 18. If you make the 12, they are very impressive and look like the store bought muffins my sister believed them to be.
Preparation:
  1. In a bowl sift together flour, baking powder and salt.
  2. In a separate bowl, cream together margarine, sugar, eggs and vanilla. Beat on high for approximately 4 minutes.
  3. Alternately add flour mixture and milk to the beaten sugar and eggs mixture, blending each completely before adding the next. Begin and end with the flour mixture.
  4. Using a spatula, carefully fold in blueberries. You want to get the spatula down to the bottom from the side of the bowl and turn up and out, and then fold into the middle.If you're good, and you should be, you should be able to fold in all berries in 4-5 folds. If you are not careful here, you'll turn your entire batter to a purple-grey mess, and it will bake that way, and look verrrry ugly. You want to keep the colour distinct from the blueberries. Also, a mistake here could waterlog the batter you worked so hard to build. You don't want that happening, do you?
  5. Bake for 20-25 minutes or until tops start to brown.


Saturday, March 10, 2012

Salmon Steaks

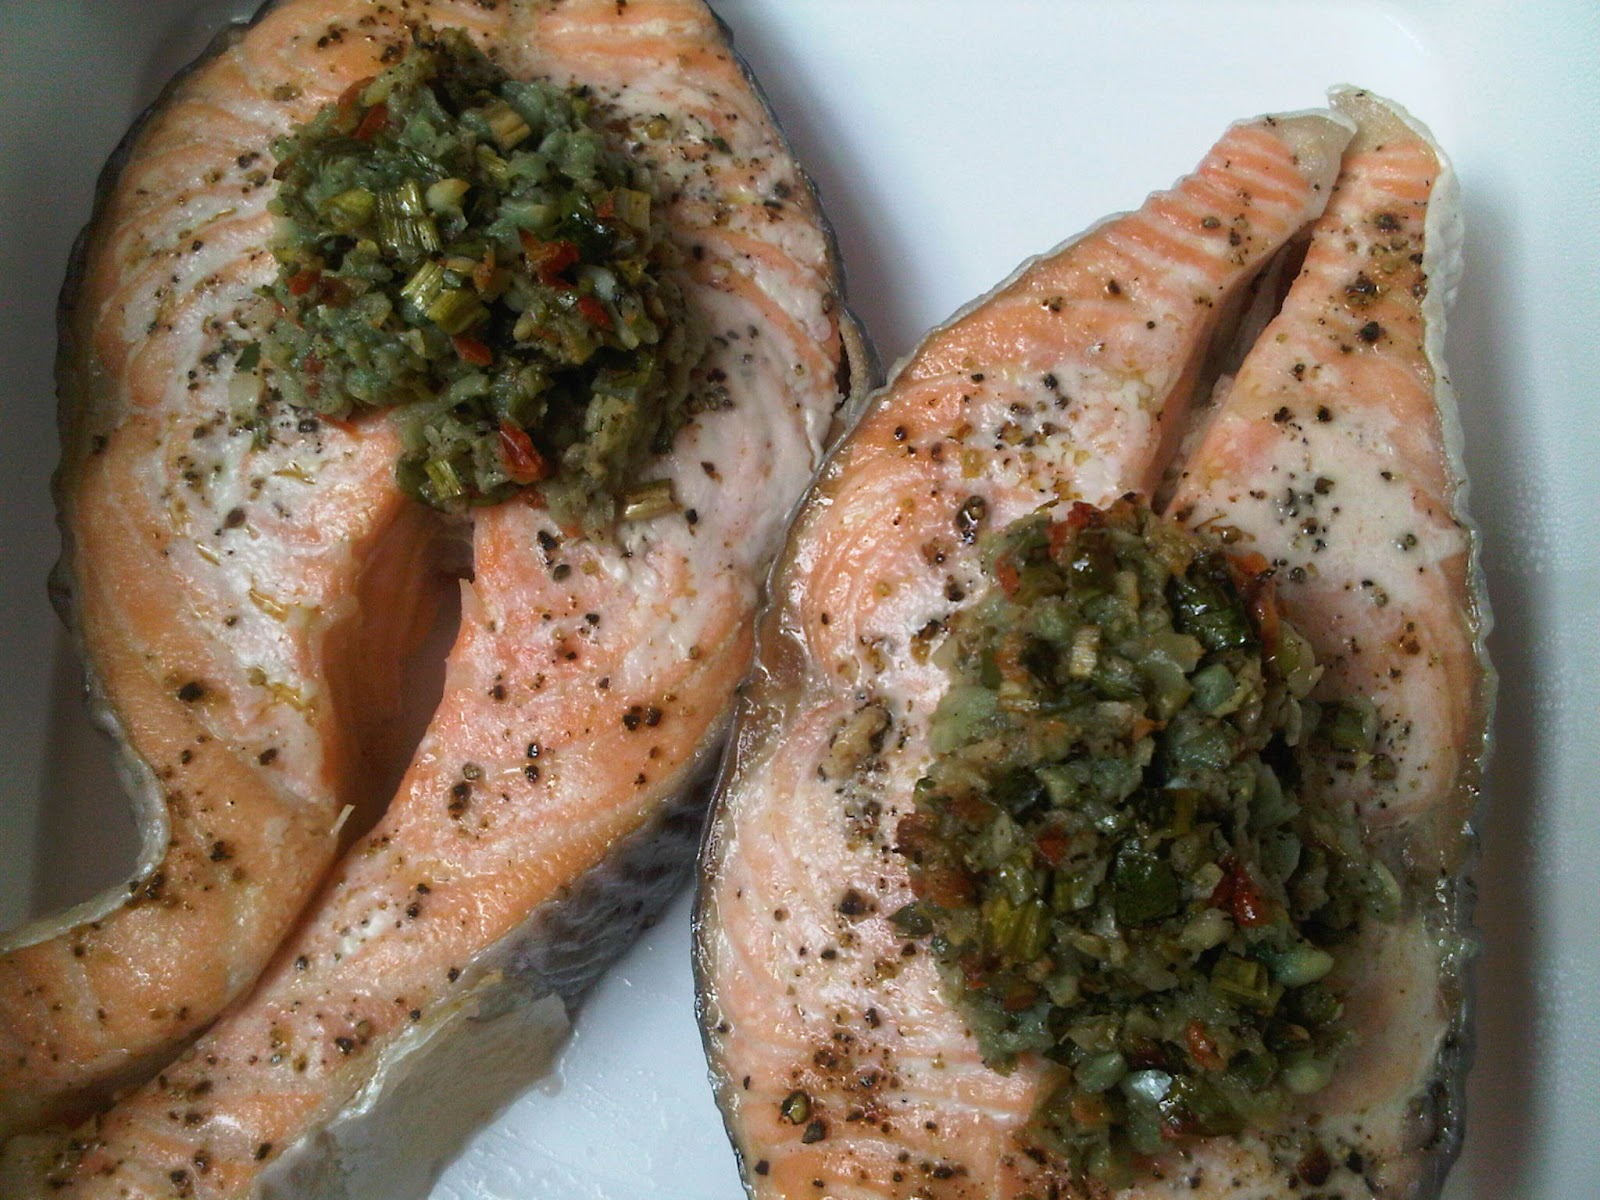
I went to the local ethnic grocery store and saw some beautiful salmon steaks, surprisingly, on sale. I scored four steaks for $12.00. Insane. They were big, beautifully reddish pink, and dark and shiny skin. So salmon it was for dinner.

Now I prefer to cook whole fish, something serving size, like a snapper, which I could stuff and serve with little fuss. I find fillets useless and would only buy portions for making fry fish (note to self: write a post on Guyanese style fry fish). And surprisingly, I don't really make salmon steaks. I think the last time I made salmon steaks was when I was living at my parents. I just don't see it as a cut I would typically prepare at home. But these ones called out to me. It was fate - they were perfect, they were on sale, and I was sure I could do it right.

The worst thing you could do to a great cut of fish (or any flesh, for that matter) is to overcook it. A creature gave up its life to sustain yours - treat it well. I didn't want to assume anything about the cooking temperature and time, so of course I tried to find some information. Going online, I found a forum that referred me to "The Canadian Fish Cookbook" by A Jan Howarth. I'm quoting the quote they posted:
"To cook fresh fish by practically any method, use the timing rule of 5-7 minutes per centimeter (10-12 minutes per inch) of thickness, measured through the thickest part."
This is a great rule of thumb. I must remember this. So I went about preparing the steaks. I always wash fish in lemon-water. There was no need to scale or clean on the steaks, so just a quick wash and rinse and it was good to go.

How to flavour them? I pride myself on seasoning well, but there are some things that are best left alone. In a bowl, I had prepared minced garlic, minced ginger, a slivered and seeded scotch bonnet, lime juice, chopped bandanya, sea salt, ground black pepper, and olive oil. but what good would it do to slather this all over the steaks? The flavour wouldn't permeate and half would fall off the grill. And look at those perfect steaks. No, I drizzled a little olive oil on them, sprinkled some sea salt, some ground black pepper, and by the rule listed above, they needed about 18 minutes in the oven at 450F.

What did I do with the marinade? At about 16 minutes, I took the steaks out and made pseudo-quenelles and placed them on the spinal bone of the steak. Because of the change in cooking time, I put them back in the oven for another 5 minutes; enough to finish the cooking and heat the dressing through. And how was it?

Moist, juicy, flake to the touch of the fork, and delicious.

I served it over rice with a side of collard greens. I'll discuss the collard greens in the next post.


Dressing for Salmon Steaks:
5 Garlic Cloves (pressed through garlic press)
1 tbsp Ginger (fresh, pressed through garlic press)
1 Scotch Bonnet pepper, seeded, halved and slivered

3 Bandanya leaves (chopped fine)
1/2 Lime (juice only)
1 tsp Black Pepper (freshly ground)
1 tsp Sea Salt (freshly ground)
4 tbsp Canola Oil
dresses four steaks

Directions (for Steaks):

Preheat oven to 450`F.
Grease roasting tray.
Place salmon dorsal out, belly together and in almost touching other steak bellies (think flower blossom)
Drizzle olive oil and brush over all steaks
Sprinkle with Sea Salt and fresh cracked Black Pepper
Stick to the guide above and remove fish when ready
If dressing fish, do so quickly and return to oven for an extra five minutes
Salmon does not require resting - can be eaten as soon as removed from the oven

Monday, January 16, 2012

Ribfest @ Centennial Park

**VERY DELAYED POST DUE TO MY GIVING BIRTH AND ALL :-) **
****************************
My sister-in-law wanted to go out for Canada Day, and as Enrique would be helping his friend move and I had to watch Kayla, I thought it would be much nicer than sitting inside the house watching TV.

I knew it would be packed, but I was not ready for this. The veritable sea of people moved en mas towards the front of the BBQ lines. Granted, we got there earlier (say, about 2.30pm) than most, but it was only going to get more crowded in the next couple hours.

We got in the gate (the security checked me for alcohol, which is funny, since I believe I'm visibly pregnant) and checked out the main alley of generic stalls, some selling clothes, others jewelry, others yet snacks of various kinds. There was a martial arts demonstration. We stopped by the lollipop shop and at 6 for $5, we vowed to get two each on the way back. We did stop in at a jewelry stall where there was a sale - I bought Jev and Kayla necklaces (Jev a blue bead and shell strands with silver buckle encased front, Kayla a silver starfish, and myself, a beige oblong and blue round shell combo with silver pieces strung between them). After that, we were getting hungry, and it was time for the ribs!

Think of a fairway, one side the front windows for all the BBQ vendors with their pits visible and prominently wafting smoke to attract patrons, one after the other, all too far to see in one go. We didn't even walk to the end of the line to see which we prefered - Jev had been there before with Dennis and they were both fans of Crabby's. She was adamant on going there again for how good they were, and I'm always up for a recommendation, so we got in the already long line and waited. Every line was long. There was no getting around it. But I guess that's what makes it part of the experience - you wait with your people, you chat, you figure out what you want, and you anticipate the food. I even went to the front to take a picture of the options so we could spend our time in line deciding. We all got the same thing; a 1/3 of ribs and coleslaw, but instead of a double coleslaw, Jev got her second side as baked beans. It was so hot out, I just wanted the cool of the veg.

Manouvering out into the park outside the gates was an ordeal! We managed though, and it wasn't long before we found a spot to spread our blanket and get our drinks. I carried our drink bag (bless her soul, Jev helped me) and my Perrier was still icy (how refreshing!). Jev had a Fresca and Kayla wanted her water. Soon we were tucking into the ribs.

Mmmmm... What to say about these ribs. They were fall off the bone, just as they should be. They weren't too saucy, but they were flavourful and juicy. More sweet, not tangy at all, but hearty. All in all, it was some great meat. Hell, if I was scraven, I would have wanted a whole half rack, but a third did me just fine. The coleslaw as well was crisp and light. An overall good meal. Eating picnic style can't hurt the experience, especially with an icy cold Perrier to wash it all down. Odd sightings as we ate: Guys playing soccer and then football just a 'little' too close for comfort, seeing as I have to guard two of us, a three legged Chocolate Lab who was super active and cute, and watching the line for the Ribfest gate double, triple, and quadruple in length.

But we went back in. Jev and Kayla lined up and I waited until I saw them, folded up the blanket and joined them. It was actually moving quite fast. We went back in, got our lollipops, (they got Jev = Coconut, Cotton Candy / Kayla = Coconut, Maple Bacon / Me = Maple Bacon, Raspberry). We headed back to the car after that, but not before sitting down near a tree to enjoy ice cream from a truck. It was the perfect end to the meal, and there were no real great desserts to be had inside the gates. Even the funnel cakes weren't served with any ice cream.

Leaving the grounds was much easier than coming in. The traffic was far less congested. And we were happy with our day.
 
Copyright 2009 Lime & Wine. Powered by Blogger Blogger Templates create by Deluxe Templates. WP by Masterplan